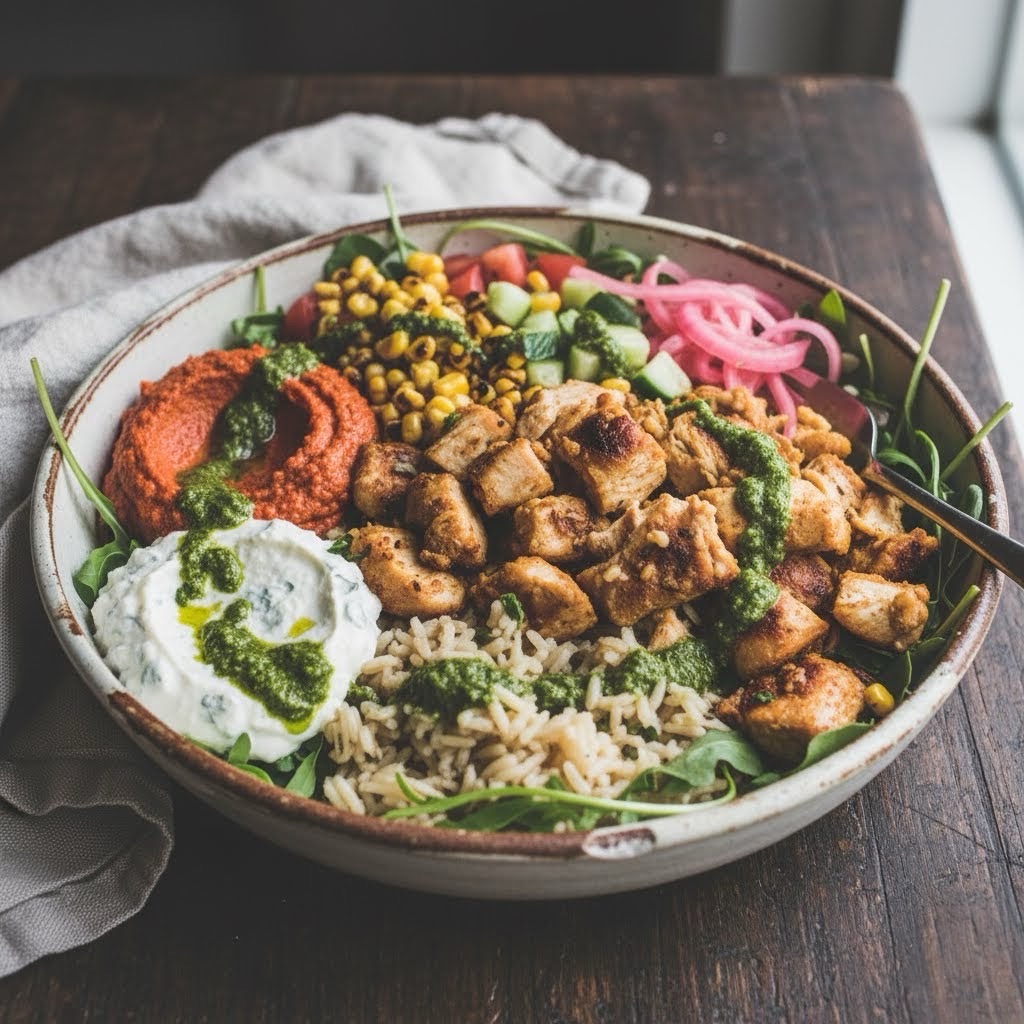
• This recipe creates a vibrant bowl with layers of flavor and texture, from the warmly spiced chicken to the creamy hummus, spicy feta, and tangy toppings.

    Yields: 4 servings

    Prep time: 30 minutes

    Cook time: 20 minutes

    Ingredients

    For the Chicken Shawarma:

    • 1.5 lbs boneless, skinless chicken thighs, cut into bite-sized pieces
    • 2 tablespoons olive oil
    • 2 cloves garlic, minced
    • 1 teaspoon cumin
    • 1 teaspoon paprika
    • 1/2 teaspoon turmeric
    • 1/2 teaspoon coriander
    • 1/4 teaspoon cinnamon
    • Salt and black pepper to taste
    • Juice of half a lemon

    For the Rice:

    • 1 cup basmati or long-grain white rice, rinsed
    • 2 cups water or chicken broth
    • Pinch of salt

    For the “Crazy Feta” (Spicy Whipped Feta):

    • 4 oz block of feta cheese, crumbled
    • 1 tablespoon olive oil
    • 1/2 jalapeño, seeds removed and roughly chopped (adjust to your spice preference)
    • 1 tablespoon water, to thin

    For the Spicy Herb Sauce:

    • 1 cup fresh cilantro, packed
    • 1/2 cup fresh parsley, packed
    • 1 jalapeño, roughly chopped
    • 1 clove garlic
    • 1/4 cup olive oil
    • 1 tablespoon lemon juice
    • 1/4 teaspoon cumin
    • Pinch of salt

    For the Garlic Dressing:

    • 1/4 cup olive oil
    • 2 tablespoons lemon juice
    • 1-2 cloves garlic, finely minced
    • 1 teaspoon Dijon mustard
    • Salt and pepper to taste

    Instructions

    1. Marinate the Chicken: In a medium bowl, combine the chicken pieces with olive oil, minced garlic, cumin, paprika, turmeric, coriander, cinnamon, salt, pepper, and lemon juice. Mix well to coat. Let it marinate for at least 20 minutes, or up to 4 hours in the refrigerator.
    2. Cook the Rice: While the chicken marinates, bring the 2 cups of water or broth to a boil in a medium saucepan. Add the rinsed rice and a pinch of salt. Reduce heat to low, cover, and simmer for 15-18 minutes, or until the liquid is absorbed. Remove from heat and let stand, covered, for 5 minutes before fluffing with a fork.
    3. Prepare the Sauces & Feta:
    • Crazy Feta: In a small food processor or blender, combine the feta, olive oil, and jalapeño. Blend until smooth and creamy, adding a tablespoon of water if needed to reach a spreadable consistency.
    • Skhug: In the same food processor (no need to clean), combine cilantro, parsley, jalapeño, garlic, olive oil, lemon juice, cumin, and salt. Blend until it forms a bright green, slightly textured sauce.
    • Garlic Dressing: In a small bowl or jar, whisk together the olive oil, lemon juice, minced garlic, Dijon mustard, salt, and pepper.
    1. Cook the Chicken: Heat a large skillet or grill pan over medium-high heat. Add the marinated chicken in a single layer (cook in batches if needed to avoid crowding). Cook for 5-7 minutes, turning occasionally, until golden brown and cooked through.
    2. Assemble the Bowls:
    • Start with a base of warm rice in each bowl.
    • Top the rice with a generous handful of arugula.
    • Arrange the cooked chicken shawarma on one side of the bowl.
    • Add scoops of red pepper hummus and the Crazy Feta.
    • Artfully add the toppings: fire-roasted corn, broccoli, pickled red onions, and the cucumber/tomato mixture.
    • Drizzle generously with the Garlic Dressing and add a small spoonful of the spicy Skhug.

    Note on Pickled Onions: For a quick pickle, thinly slice one red onion and place it in a jar. Cover with white vinegar, a teaspoon of sugar, and a half teaspoon of salt. Shake well and let it sit for at least 30 minutes.

  • This method uses a quick boil to ensure the potatoes are cooked through before they even hit the skillet. The pan is then used exclusively to create a delicious, savory crust.

    Yields: 4-5 servings Prep Time: 10 minutes Cook Time: 20-25 minutes

    Ingredients:

    • 2 lbs Yukon Gold or red potatoes (about 4-5 medium potatoes)
    • 1 medium yellow onion, diced
    • 1 medium bell pepper (any color), diced
    • 2 tablespoons high-smoke-point oil (like canola, vegetable, or avocado oil)
    • 1 tablespoon unsalted butter
    • 1 teaspoon smoked paprika
    • 1/2 teaspoon garlic powder
    • 1/2 teaspoon onion powder
    • Kosher salt and freshly ground black pepper, to taste
    • 1 tablespoon fresh parsley, chopped (for garnish)

    Equipment:

    • Large pot or Dutch oven
    • Large skillet (cast iron or non-stick works best)
    • Slotted spoon or spider strainer

    Instructions:

    1. Par-Cook the Potatoes (The Secret Step):
    • Wash the potatoes well (peeling is optional for Yukon Gold or red potatoes). Cut them into uniform 3/4-inch cubes.
    • Place the cubed potatoes in a large pot and cover with cold, salted water by about an inch.
    • Bring the water to a boil and cook for 6-8 minutes, or until the potatoes are just barely tender when pierced with a fork. You are not trying to cook them through completely, just give them a head start.
    • Crucial: Drain the potatoes very well using a colander or slotted spoon. Let them sit and steam dry for a few minutes, or gently pat them dry with a paper towel. Wet potatoes will steam, not fry.
    1. Heat Your Skillet: Place a large skillet over medium-high heat and add the oil. Let the oil get hot until it shimmers.
    2. The First Fry (Create the Crust):
    • Carefully add your dry, par-cooked potatoes to the hot skillet in a single, even layer. Do not overcrowd the pan (use two pans if necessary).
    • Let them cook for 4-5 minutes without moving them. This allows a golden-brown crust to develop on the bottom. Resist the temptation to stir!
    1. The Second Fry (Add the Flavor):
    • After the crust has formed, use a spatula to flip the potatoes.
    • Add the butter, diced onion, and diced bell pepper to the skillet. Stir everything together.
    • Continue to cook for another 5-7 minutes, stirring occasionally, until the onions and peppers are soft and the potatoes are crispy and golden on all sides.
    1. Season and Serve:
    • In the last minute of cooking, sprinkle the smoked paprika, garlic powder, onion powder, salt, and pepper over the potatoes. Stir continuously to coat everything evenly and toast the spices without burning them.
    • Remove from the heat, garnish with fresh parsley, and serve immediately.

    Why This Recipe Works

    • Par-cooking guarantees the inside of the potato is perfectly tender, so you only need to focus on getting the outside crispy in the pan.
    • Dry potatoes are essential. Moisture is the enemy of crispiness.
    • Waiting to add the onions and peppers prevents them from releasing their water too early and steaming the potatoes. It also stops them from burning.

    Seasoning at the end allows the spices to bloom in the hot pan without scorching, ensuring the best flavor.

  • This technique involves coating the bacon in a sweet and slightly spicy mixture and then twisting it before baking. The twisting creates a unique, chewy and crispy texture, while the oven-baking renders the fat perfectly and caramelizes the sugary coating.

    Yields: 12-16 twists Prep time: 10 minutes Cook time: 25-35 minutes

    Ingredients:

    • 1 pound of standard-cut bacon (avoid thick-cut as it won’t twist as easily)
    • 1/2 cup brown sugar (light or dark will work)
    • 1 teaspoon black pepper (freshly ground is best)
    • 1/2 teaspoon cayenne pepper or smoked paprika (optional, for a little heat)

    Equipment:

    • Baking sheet
    • Wire cooling rack that fits inside the baking sheet
    • Tongs
    • Shallow dish or plate

    Instructions:

    1. Preheat and Prep: Preheat your oven to 375°F (190°C). Place the wire rack inside the baking sheet. This setup is crucial as it allows the hot air to circulate around the bacon, ensuring it cooks evenly and the fat drips away, resulting in a crispier final product.
    2. Create the “Candy” Coating: In a shallow dish or on a plate, mix together the brown sugar, black pepper, and cayenne pepper or paprika, if using.
    3. Twist the Bacon: Take one slice of bacon and, holding both ends, twist it tightly from end to end. It should look like a rope.
    4. Dredge in Sugar Mixture: Roll the bacon twist in the brown sugar mixture, ensuring it is evenly coated on all sides.
    5. Arrange on the Rack: Place the sugar-coated bacon twist on the wire rack. Repeat with the remaining bacon slices, leaving a little space between each twist.
    6. Bake: Place the baking sheet in the preheated oven. Bake for 25-35 minutes. The timing can vary depending on the thickness of your bacon and your oven’s performance. The bacon is done when it is deep golden-brown and the sugar coating has caramelized. Keep a close eye on it towards the end of the cooking time, as the sugar can go from caramelized to burnt quickly.
    7. Cool and Crisp: Remove the baking sheet from the oven. Let the bacon twists cool on the wire rack for at least 10 minutes. As they cool, they will harden and become crisp.
    8. Serve: Once cooled, the candied bacon twists are ready to be enjoyed. They can be served warm or at room temperature.

    This method elevates bacon into a truly special treat that is sure to impress.

  • This recipe is perfect for a nutritious weeknight dinner or for meal prepping lunches. Each component is seasoned to be delicious on its own, and they come together to create a truly satisfying meal

    Yields: 4 servings Prep time: 15 minutes Cook time: 30-35 minutes

    Ingredients:

    For the Bowl:

    • 1 cup uncooked quinoa, rinsed
    • 1 large sweet potato (about 1 lb), peeled and cut into 3/4-inch cubes
    • 2 medium zucchinis, cut into 3/4-inch half-moons
    • 1 lb boneless, skinless chicken breasts, cut into 1-inch cubes
    • 2 tablespoons olive oil, divided
    • 1 teaspoon smoked paprika, divided
    • 1 teaspoon garlic powder, divided
    • Kosher salt and freshly ground black pepper, to taste

    For the Lemon-Herb Vinaigrette:

    • 1/4 cup extra virgin olive oil
    • 2 tablespoons fresh lemon juice (about 1 lemon)
    • 1 teaspoon Dijon mustard
    • 1 teaspoon honey or maple syrup (optional, for balance)
    • 1/4 teaspoon dried oregano (or 1 teaspoon fresh, chopped)
    • Salt and pepper, to taste

    Optional Toppings:

    • Crumbled feta cheese
    • Toasted pumpkin seeds or slivered almonds
    • Fresh parsley or cilantro, chopped

    Instructions:

    1. Roast the Sweet Potatoes: Preheat your oven to 400°F (200°C). On a large baking sheet, toss the cubed sweet potato with 1 tablespoon of olive oil, 1/2 teaspoon of paprika, 1/2 teaspoon of garlic powder, salt, and pepper. Spread into an even layer and roast for 15 minutes.
    2. Cook the Quinoa: While the potatoes are roasting, cook the quinoa. In a medium saucepan, combine the rinsed quinoa with 2 cups of water or broth. Bring to a boil, then reduce the heat to low, cover, and simmer for 15 minutes, or until the water is absorbed. Remove from heat and let it stand, covered, for 5 minutes. Fluff with a fork.
    3. Add the Zucchini: After the sweet potatoes have roasted for 15 minutes, remove the pan from the oven. Add the zucchini to the baking sheet, drizzle with a little more olive oil, and toss with the potatoes. Return the pan to the oven and roast for another 15-20 minutes, until both sweet potato and zucchini are tender and slightly caramelized.
    4. Cook the Chicken: While the vegetables finish roasting, cook the chicken. Pat the chicken cubes dry with a paper towel. Season them with the remaining 1/2 teaspoon of paprika, 1/2 teaspoon of garlic powder, salt, and pepper. Heat the remaining 1 tablespoon of olive oil in a large skillet over medium-high heat. Add the chicken in a single layer and cook for 5-7 minutes, turning occasionally, until golden brown and cooked through.
    5. Make the Vinaigrette: In a small bowl or a jar with a lid, combine all the vinaigrette ingredients (olive oil, lemon juice, Dijon mustard, honey/maple syrup, oregano, salt, and pepper). Whisk or shake vigorously until well combined and emulsified.
    6. Assemble the Bowls: To build your bowls, start with a base of cooked quinoa. Top with a generous portion of the roasted sweet potatoes and zucchini, and the cooked chicken. Drizzle everything with the lemon-herb vinaigrette and add any optional toppings you desire.

    Meal Prep & Storage Tips

    This bowl is perfect for meal prep! For the best results, store the quinoa, chicken, and roasted vegetables in separate airtight containers in the refrigerator for up to 4 days. Store the dressing separately. When ready to eat, you can enjoy it cold or gently reheat the components before assembling and adding the dressing.

  • This smoothie isn’t just fruit and sugar; it’s a balanced meal in a glass. It combines protein, healthy fats, and fiber to prevent a mid-morning crash, making it the perfect way to start your day.

    Yields: 1 serving Prep time: 5 minutes

    Ingredients:

    • 1 cup Milk (dairy, almond, oat, or your favorite kind)
    • 1/2 cup Plain Greek Yogurt (for a big protein boost)
    • 1 cup Frozen Strawberries (using frozen fruit makes the smoothie thick and cold without ice)
    • 1/2 large Banana (peeled and preferably frozen in chunks)
    • 1 tablespoon Almond Butter or Peanut Butter (for healthy fats and flavor)
    • 1 large handful of fresh spinach (optional, but you won’t taste it!)
    • 1 tablespoon Rolled Oats or Chia Seeds (optional, for extra fiber and staying power)

    Instructions:

    1. Load the Blender: Pour the milk into your blender first. This helps the blades spin freely and prevents the thicker ingredients from getting stuck.
    2. Add Remaining Ingredients: Add the Greek yogurt, spinach (if using), almond butter, and oats/chia seeds (if using). Finally, add the frozen strawberries and banana.
    3. Blend Until Smooth: Secure the lid and blend on high for 45-60 seconds, or until the smoothie is completely smooth and creamy. If it’s too thick, add another splash of milk. If it’s too thin, add a few more frozen berries.
    4. Serve Immediately: Pour into a glass and enjoy your nutritious breakfast!

    Customization and Tips:

    • Protein Powder Swap: You can easily substitute the Greek yogurt with one scoop of your favorite vanilla or unflavored protein powder.
    • Make it Sweeter: If you prefer a sweeter smoothie, add a teaspoon of honey or maple syrup. The banana usually provides enough sweetness on its own.
    • Change the Fruit: Feel free to swap the strawberries for any other frozen fruit like mixed berries, mango, or peaches.
    • Nut-Free Version: Use sunflower seed butter instead of almond or peanut butter.
    • Meal Prep Smoothie Packs: For ultra-fast mornings, portion the banana, strawberries, spinach, and oats/chia seeds into individual freezer bags. When you’re ready for a smoothie, just dump the contents of one bag into the blender, add your milk and yogurt/protein powder, and blend!

  • This recipe will give you a golden-brown, crispy exterior with a soft, tender interior. Say goodbye to soggy, gray potatoes forever.

    Yields: 2-3 servings Prep time: 15 minutes Cook time: 10-12 minutes

    Ingredients:

    • 2 medium Russet potatoes (about 1 pound)
    • 2 tablespoons neutral oil with a high smoke point (like canola, vegetable, or grapeseed oil), or clarified butter
    • 1 tablespoon unsalted butter (for flavor)
    • 1/2 teaspoon kosher salt
    • 1/4 teaspoon black pepper

    Equipment:

    • Box grater or food processor with a shredding attachment
    • Large bowl of cold water
    • Cheesecloth, a clean kitchen towel, or a potato ricer
    • Large non-stick or cast-iron skillet

    Instructions:

    1. Prep the Potatoes: Wash and peel the potatoes.
    2. Shred the Potatoes: Using the large holes of a box grater, shred the potatoes directly into a large bowl of cold water. Submerging them immediately prevents the potato shreds from oxidizing and turning an unappealing gray color.
    3. Rinse and Squeeze (The Most Important Step!): Let the shredded potatoes sit in the cold water for a few minutes. You’ll see the water become cloudy as the starch releases. Drain the potatoes in a colander. Now, for the crucial part: removing the water.
    • Method: Place a handful of the shredded potatoes in the center of a large piece of cheesecloth or a clean, lint-free kitchen towel. Gather the edges and twist as hard as you can, squeezing out every last drop of moisture. The drier the potatoes, the crispier your hash browns will be. Repeat until all potatoes are squeezed dry.
    1. Season the Potatoes: Place the dry potato shreds in a clean, dry bowl. Toss them with the salt and pepper until evenly distributed.
    2. Heat the Pan: Place a large non-stick or cast-iron skillet over medium-high heat. Add the neutral oil. You’ll know the pan is hot enough when the oil shimmers slightly.
    3. Form the Patty: Carefully spread the shredded potatoes in the hot pan, forming an even layer or individual patties. Do not press down too firmly at first; you want the steam to be able to escape.
    4. Cook Undisturbed: Let the hash browns cook for 4-6 minutes without touching them. This allows a beautiful, golden-brown crust to form. Resist the urge to peek or stir.
    5. Flip and Finish: Once the bottom is golden and crispy, add the tablespoon of butter to the pan (it will melt around the edges and add flavor). Flip the hash brown patty (or patties) with a wide spatula. Cook for another 4-6 minutes on the other side until it’s equally golden and crispy.
    6. Serve Immediately: Transfer the hash browns to a plate and serve hot. Enjoy the crispy perfection!
  • This recipe focuses on assembling the wrap with ingredients that closely mimic the original’s taste and texture.

    Yields: 4 Snack Wraps

    Prep time: 10 minutes

    Cook time: 20 minutes

    Ingredients

    For the Crispy Chicken:

    • 2 boneless, skinless chicken breasts (about 1 lb total)
    • 1 cup all-purpose flour
    • 1 teaspoon salt
    • 1/2 teaspoon black pepper
    • 1/2 teaspoon paprika
    • 1/4 teaspoon garlic powder
    • 1 large egg
    • 1 tablespoon milk or water
    • Vegetable or canola oil for frying

    Pro-Tip: For ultimate convenience and an authentic taste, you can use frozen, fully-cooked crispy chicken strips (like Tyson or a store brand). Just cook them according to the package directions.

    For the Copycat Ranch Sauce:

    • 1/2 cup mayonnaise
    • 1/4 cup buttermilk (or regular milk with a squeeze of lemon juice)
    • 1/2 teaspoon dried dill
    • 1/2 teaspoon garlic powder
    • 1/2 teaspoon onion powder
    • 1/4 teaspoon dried parsley
    • A pinch of salt and black pepper

    For Assembly:

    • 4 medium (8-inch) flour tortillas
    • 1 cup shredded lettuce (iceberg or romaine)
    • 1/2 cup shredded cheddar cheese (a finely shredded blend with Monterey Jack is even better)

    Instructions:

    Step 1: Prepare the Crispy Chicken

    1. Slice each chicken breast lengthwise into two or three even-sized tenders.
    2. In a shallow dish, mix together the flour, salt, pepper, paprika, and garlic powder.
    3. In another shallow dish, whisk together the egg and milk.
    4. Dredge each chicken tender first in the flour mixture, then dip it completely in the egg wash, and finally, press it firmly back into the flour mixture for a thick coating.
    5. Heat about an inch of oil in a large, heavy-bottomed skillet over medium-high heat to about 350°F (175°C).
    6. Carefully place the coated chicken tenders in the hot oil, ensuring not to overcrowd the pan. Fry for 3-5 minutes per side, until golden brown and cooked through.
    7. Remove the chicken from the skillet and place it on a wire rack to drain.

    Step 2: Make the Ranch Sauce

    1. While the chicken is cooking, whisk together all the sauce ingredients (mayonnaise, buttermilk, dill, garlic powder, onion powder, parsley, salt, and pepper) in a small bowl.
    2. For the best flavor, let the sauce sit for at least 15 minutes for the dried herbs to meld. This can be made ahead of time.

    Step 3: Assemble the Snack Wraps

    1. Warm the flour tortillas for about 15-20 seconds in the microwave or a dry skillet to make them soft and pliable.
    2. Place one crispy chicken tender (or half of a larger chicken breast piece) slightly off-center on a warm tortilla.
    3. Drizzle a generous amount of the ranch sauce over the chicken.
    4. Sprinkle a handful of the shredded cheese and shredded lettuce over the chicken and sauce.
    5. To fold, tuck in the bottom of the tortilla first, then tightly roll it from one side to the other, just like they did at McDonald’s.
    6. Serve immediately and enjoy the nostalgia!
  • This no-cook recipe is packed with protein to keep you full and energized throughout the morning.

    Yields: 1 serving Prep time: 5 minutes

    Ingredients:

    • 1/2 cup part-skim ricotta cheese
    • 1/2 cup plain Greek yogurt (2% or whole milk recommended for creaminess)
    • 1/2 cup fresh or frozen berries (such as raspberries, blueberries, or sliced strawberries)
    • 1 tablespoon chopped nuts (almonds, walnuts, or pistachios work well)
    • 1 teaspoon honey or maple syrup (optional, for extra sweetness)
    • A sprinkle of chia seeds or flax seeds for an extra boost of fiber and omega-3s (optional)

    Instructions:

    1. Combine the Dairy: In a small bowl, gently stir together the ricotta cheese and Greek yogurt until they are just combined. Be careful not to overmix.
    2. Layer the Parfait: In a glass or jar, create layers with the ricotta-yogurt mixture and the berries. Start with a layer of the cheese and yogurt mixture, followed by a layer of berries. Repeat until you have used all of the ingredients, finishing with a layer of berries on top.
    3. Add Toppings: Sprinkle the chopped nuts and seeds (if using) over the top of the parfait.
    4. Sweeten and Serve: Drizzle with honey or maple syrup if desired. The parfait can be enjoyed immediately or covered and stored in the refrigerator for up to 2 days for a quick grab-and-go breakfast.

    This recipe is easily customizable. Feel free to use your favorite fruits and nuts to make it your own!

  • This vibrant and healthy dish is perfect for a light lunch or as a side to a summer meal.

    Yields: 2-4 servings Prep time: 15 minutes

    Ingredients:

    • 2 medium zucchini, washed and ends trimmed
    • 2 medium purple carrots (or any color carrot), peeled
    • 1/4 cup pine nuts, toasted
    • A generous handful of fresh mint leaves, roughly chopped
    • 2 tablespoons extra-virgin olive oil
    • 1 tablespoon fresh lemon juice
    • Salt and freshly ground black pepper to taste

    Equipment:

    • Vegetable peeler or mandoline
    • Large bowl
    • Small, dry skillet

    Instructions:

    1. Prepare the Vegetables: Using a vegetable peeler or a mandoline on its thinnest setting, shave the zucchini and carrots into long, thin ribbons. Place the ribbons in a large bowl.
    2. Toast the Pine Nuts: In a small, dry skillet over medium heat, toast the pine nuts, shaking the pan frequently, until they are fragrant and lightly golden brown. This should take about 2-3 minutes. Keep a close eye on them as they can burn quickly. Remove from the heat and let them cool slightly.
    3. Combine the Salad: Add the toasted pine nuts and chopped fresh mint to the bowl with the zucchini and carrot ribbons.
    4. Dress the Salad: In a small bowl or jar, whisk together the extra-virgin olive oil and fresh lemon juice. Pour the dressing over the salad.
    5. Season and Serve: Season generously with salt and freshly ground black pepper. Toss everything together gently to combine. Taste and adjust seasoning if necessary. Serve immediately and enjoy!

    Tips and Variations:

    • For a bit of a kick, add a pinch of red pepper flakes to the dressing.
    • Crumbled feta or goat cheese would be a delicious addition.
    • Feel free to substitute other nuts or seeds, such as toasted almonds or sunflower seeds.
    • If you don’t have fresh mint, fresh basil or parsley would also work well.
    • For a more substantial meal, add some grilled chicken, shrimp, or chickpeas.